Parking Three (3) Vehicles #
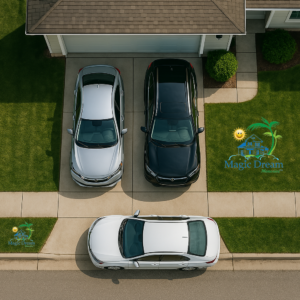 With three vehicles, it will be important not to block the sidewalk, park on the pavers, or park on the street. The properties are monitored, and violations are reported to the HOA, leading to threats of a citation.
The good news is that you will be able to park three vehicles in the driveway. The first two will park as you usually would, front-to-back. The third vehicle can be parked on the driveway apron. This is the front section of the driveway between the sidewalk and the street.
TV Instructions #
Click here for instructions on using the Fire TV and remote.
Internet and Wi-fi #
Free high-speed Internet is available! The login information can be found on stickers placed throughout the home. The main sticker is located on the sound bar just below the Television in the main living room. Other stickers are located on the keyboards for the smart TVs. The Wi-fi code is also provided through in your welcome email.
House Lighting #
Dimmable Lights #
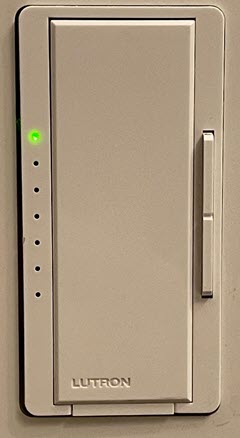
Throughout the house we try to provide dimmable light switches and bulbs. This allows you to set the ambiance of the room to your individual preference.
|
|
To adjust the lighting, simply push the button to turn on the light, then use the rocker buttons on the right side; up for brighter, down for softer. If you would like to quickly turn the light to full-power, double-tap the light switch. |
Motion Activated Lights #
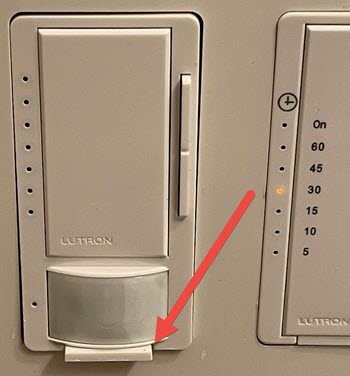
Motion activated lights are used in the front entry and bathrooms. This is to help minimize fumbling for light switches when entering an unfamiliar, but important, area! The motion activated light switches are also dimmable.
|
|
If you would like to disable the motion activated light switches, use your fingernail to pull the control tab from the bottom of the switch. |
Fan Controllers #
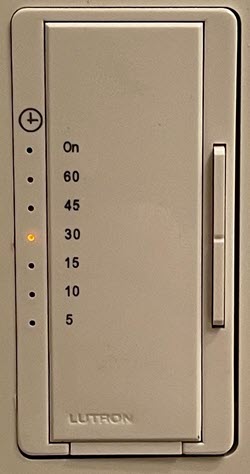
Some fans are on timer controllers allowing you to set the fan to turn off after a set period of time.
|
|
Using the rocker on the right side of the controller, simply adjust the time up for longer, or down for shorter. |
Door Locks and Latches #
Front Door #
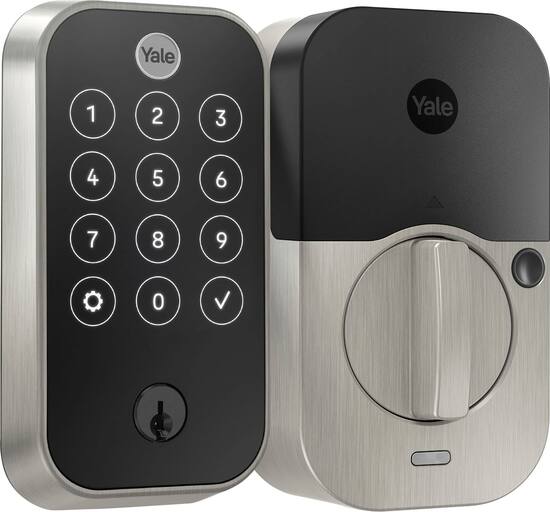
The home is equipped with a keyless lock entry system. Your welcome letter will include your 6-digit code. The keypad is on the door. Look for the YALE label, then press the YALE button with your finger to activate the entry pad. The numbers will display when activated.
|
|
Unlocking the door #
|
Locking the door #
|
Back Patio Door #
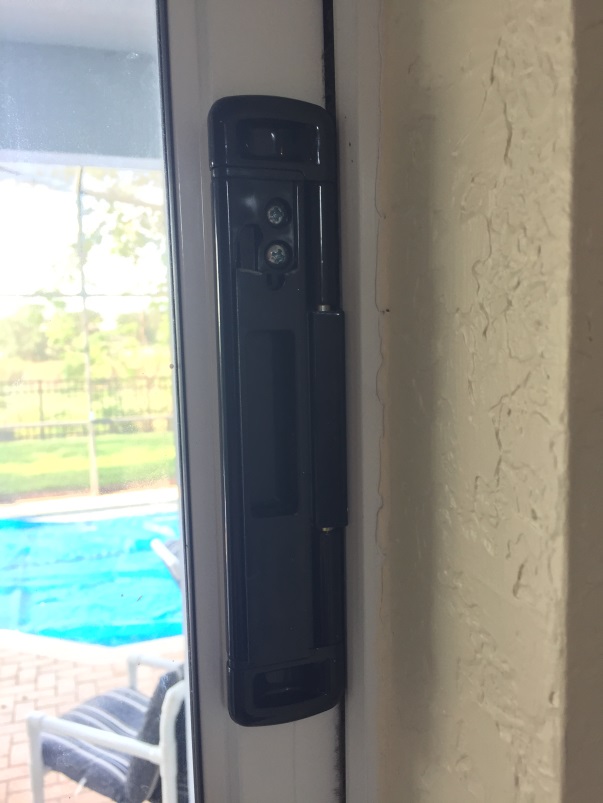
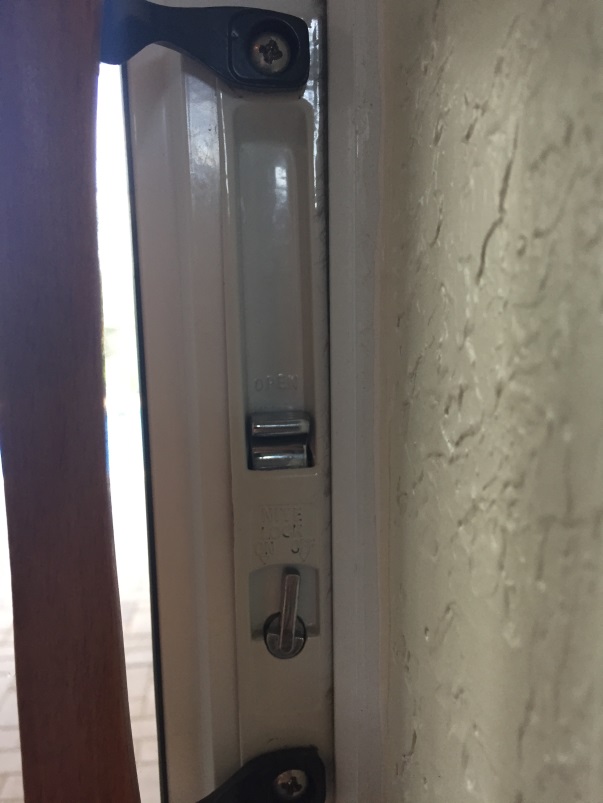
To unlock and open the back patio sliding door, please reference the below instructions. This is a high-security lock and is located at an elevated level so small children do not unlock the door.
|
|
1. Locate the black main locking mechanism. |
|
|
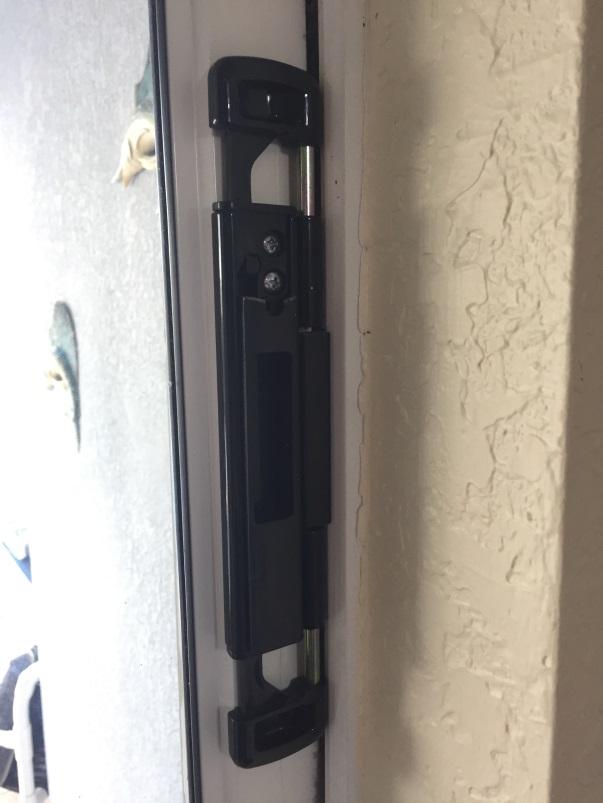
2. Pull the two upper and lower latches upward and downward respectively to unlock. |
|
|
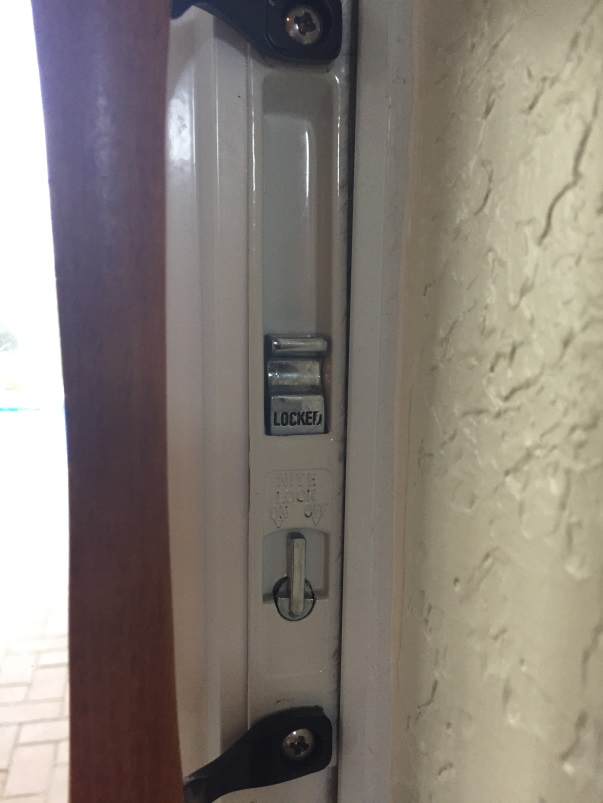
3. The patio door should now be unlocked. If the door still will not open, please ensure the lower latch is not locked. The following image shows the lower latch in a Locked position. |
|
|
4. Press down on the silver latch marked Locked to disengage the lock. |
|
5. Both patio door locks are now unlocked. |
|
Thermostat / Home Air Conditioning #
Our home is equipped with three (3) separate A/C units for your use. There are two (2) A/C units within the main living areas of the home and one unit in the game room. Please refer to the following information
To adjust the temperature of the home, please refer to the following information. Please note there are TWO thermostats in the home. One thermostat is located upstairs at the top of the stairs and the other is downstairs next to the living room television set.
Main Living Area Air Conditioning #
|
|
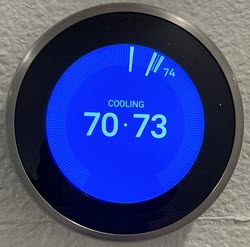
1. Locate a thermostat (shown in the below image). 2. Adjust the temperature by lightly gripping the outside silver ring and turning the ring either left or right to adjust the desired temperature. Press the center of the glass to select an item. 3. The home Air Conditioning unit will automatically begin to cool to the desired temperature. |
|
Please note there is no need to adjust any of the other thermostat settings or options. The thermostat is already programmed to operate on a standard schedule. |
|
Theater/Game Room Air Conditioning #
The game room comes equipped with a separate A/C unit independent from the rest of the home. If you would like to utilize this A/C unit, please reference the below information.
|
|
|
|
|
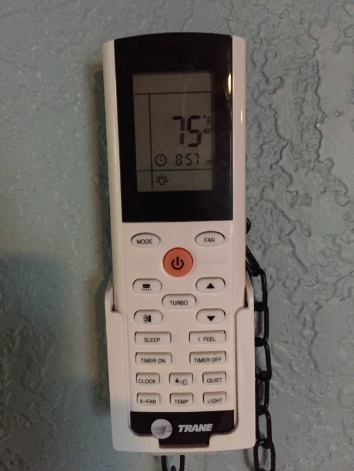
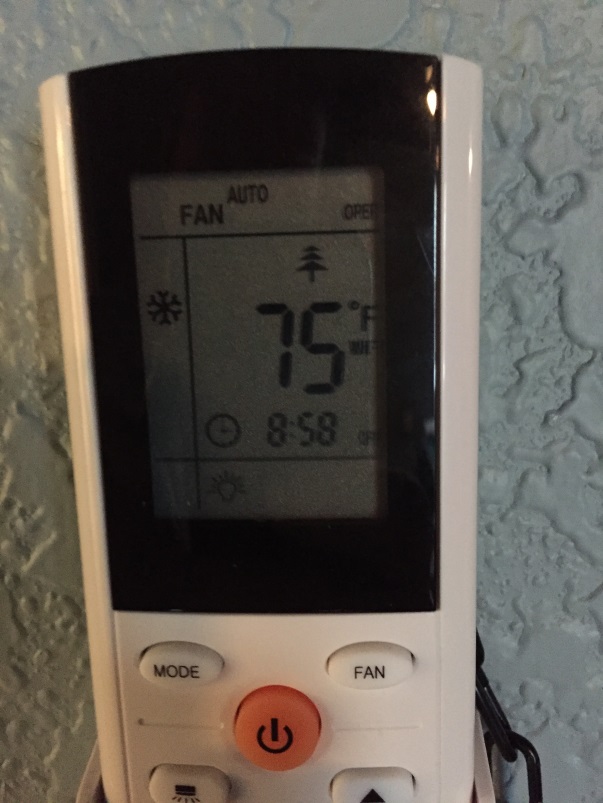
1. Locate the A/C unit remote control located on the wall near the entrance to the game room (pictured below). 2. Remove the remote from the wall holster and point it at the A/C unit. |
|
|
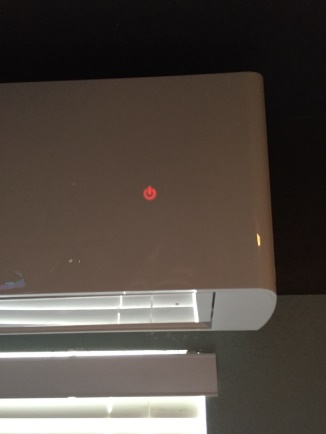
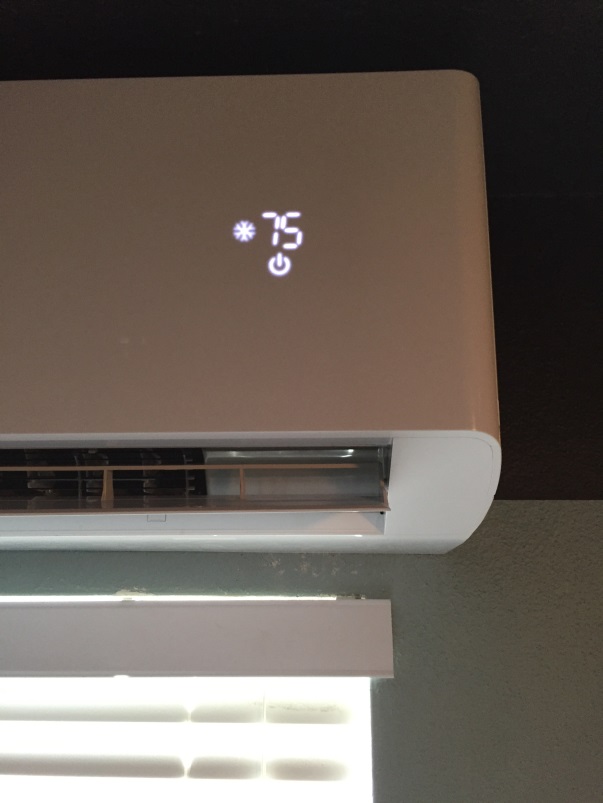
3. Note the A/C is NOT on when a red power logo is displayed on the unit (pictured below). |
|
|
4. Press the orange power button on the remote and the A/C unit should turn on. 5. You will now see the power logo on the A/C unit turn white with the set temperature displayed. The snow flake symbol indicates the unit is in cooling mode. Also, the remote will now show the fan set to Auto and in cooling mode (pictured below). |
|
|
6. The A/C unit is now on and cooling to the set temperature. 7. To turn off the A/C unit, point the remote at the unit and press the orange power button. |

Televisions and Streaming Services #
Instructions #
We have updated all TVs to use the Amazon Fire TV platform. This will help provide a consistent remote control and viewing experience across TVs in the home. This will also help simplify finding programs to watch and accessing live television channels
Click here for details on the TV remotes and streaming services.
Note: Please do not disconnect the cables from our TV systems. This has caused significant problems in the past and is a great inconvenience for our team and future guests.
Gaming System HDMI Ports #
The game systems can be accessed by changing to the appropriate HDMI port. On the remote control, press and hold the  button then speak “Input HDMI 2” or the appropriate port number as described below:
- 7706 Games Room
- Streaming TV: HDMI 1
- Xbox: HDMI 2
- Playstation: HDMI 3
Xbox One Game System #
This home is setup with Xbox Game Pass. This is a game subscription service which allows access to over 100 games on the Xbox One gaming system!
Each house has a game account setup and connected. Please do not log out of our game account. Logging out of our account may result in a charge from my management company to log-in to the service again.
However, you are welcome to log into your own account separately. but this may inhibit your access to Game Pass games.
Since games must be downloaded to play, you are welcome to download games, and delete existing games as needed.
Click here for a list of the Xbox Game Pass list of games available
Note: I’m still trying but have not been able to get my hands on an Xbox Series X since the day it was released!
Playstation 4 Game System #
For the Playstation, we encourage you to bring your own games.
Arcade Machine #
Our arcade machine supports a wide variety of games. With such variety the buttons are not labeled as they change between games.
If a game is already running, press-and-hold the Player 1 button for about 10-seconds. This will return you to the main game selection menu. For some games, you will have to wait until the game ends for this process to work.
We do not charge to play the games, but you do need to add a credit to the game. For this, there is a credit button located next to the coin location. After a game has been selected, press the credit button to add credits. You can then press the player 1 or player 2 buttons to start the game.
Pinball Machine #
This house has a Star Wars Pro pinball machine. No coins are required, just have fun!
Click here to see a video about the making of the Star Wars pinball machine
Sound Systems #
Sonos Speaker Systems #
The home has been updated with Sonos speaker systems in the Theater/Games room, Main Living Room, and Poolside television. The TVs are configured to automatically control the Sonos speaker and surround system when available. No special action is required.
If you wish to play music from your phone, you can explore the following links:
Apple Phones: Stream AirPlay audio to Sonos
Android Phones: Play music stored on your Android device
Karaoke Machine #
Music is available with the USB device on the Karaoke machine. You can also connect to the Karaoke using Bluetooth.
Private Pool / SPA #
We are excited to offer an outdoor pool and SPA for your use while you stay in our home. Please reference the below instruction on how to properly operate the SPA heater and jets along with the LED colored lights.
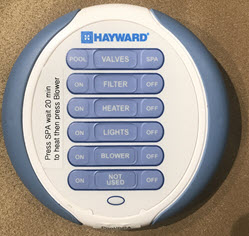
SPECIAL NOTE: The following image is of the pool /SPA remote control. The only three options you will need to use are SPA , Blower, and Lights. All other options should not be used or adjusted to ensure the settings remain as expected.
Please keep the pool/SPA remote away from children.
Do not press the Heater Off button. This will stop the heater from running. Press the Heater On button will return the heater to automatic mode if you accidentally press off.
Heating the SPA #
Heating the SPA for use (steps should be performed about 30-minutes before use):
|
|
1. Locate the pool / SPA remote control as pictured below (typically stored next to the living room television set.) 2. Press the SPA button on the remote. 3. After a short pause, the pool valve will change channeling the water to the SPA and the pump will go to full speed. |
|
|
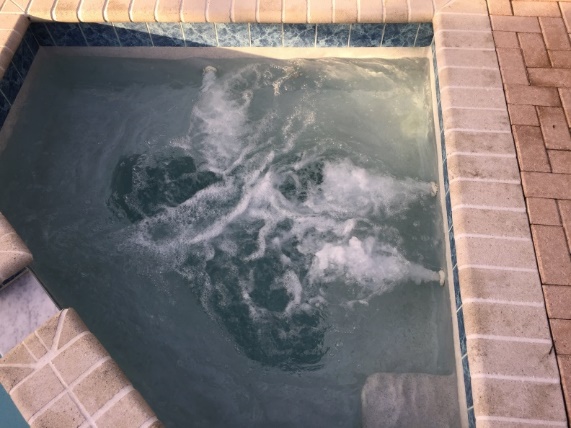
4. After approximately 20-minutes, depending on the outside temperature, the temperature of the SPA should be ready for use. 5. Press the On button for the Blower. The blower jets will run for approximately 1-hour. They can be turned off by pressing the off button if you do not wish to use the jets. |
|
Note: The SPA heater will automatically shut off after approximately two (2) hours. |
|
Turning on / off the SPA Massaging Jets (Blower) #
If you would like to turn on the massaging SPA jets: (Anticipated installation is March 2022)
- Press the On button for the Blower option. You should see the jets turn on after a brief moment.
Note: While the SPA is heating, do NOT turn on the jets as this will take longer to heat the spa. Once the SPA has reached temperature and you are ready to use, the blower jets may be turned on. This comes as a recommendation from the pool management / service staff.
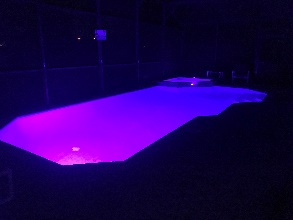
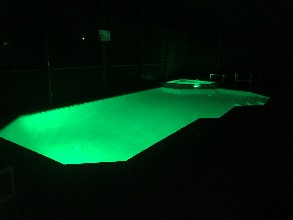
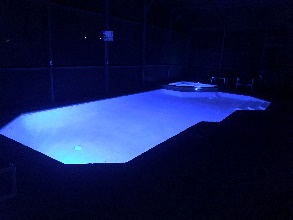
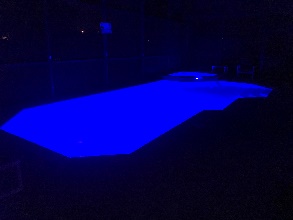
Pool / SPA Lighting #
To turn on the pool and SPA lights:
- Press the On button for the Lights option. The lights within the pool and SPA will turn on.
- Pressing the Off then On button in rapid succession will change the color of the pool lights!
Gas Grill #
For your convenience, we provide a good quality gas grill with the home. We also include a propane tank to get you started. Please note that our team is not able to ensure the tank is full prior to your visit but it should get you started.
Troubleshooting if the grill will not light #
If you cannot hear the igniter clicking, the batter may need to be replaced. Please ask our team for assistance.
If the igniter is working but the grill does night light, the propane tank may have gone into safety mode. This is a common problem with a simple solution:
- Turn off the propane tank using the knob at the top of the tank.
- Then ensure all the burners are turned to the off position.
- Wait about 10-minutes then try again.
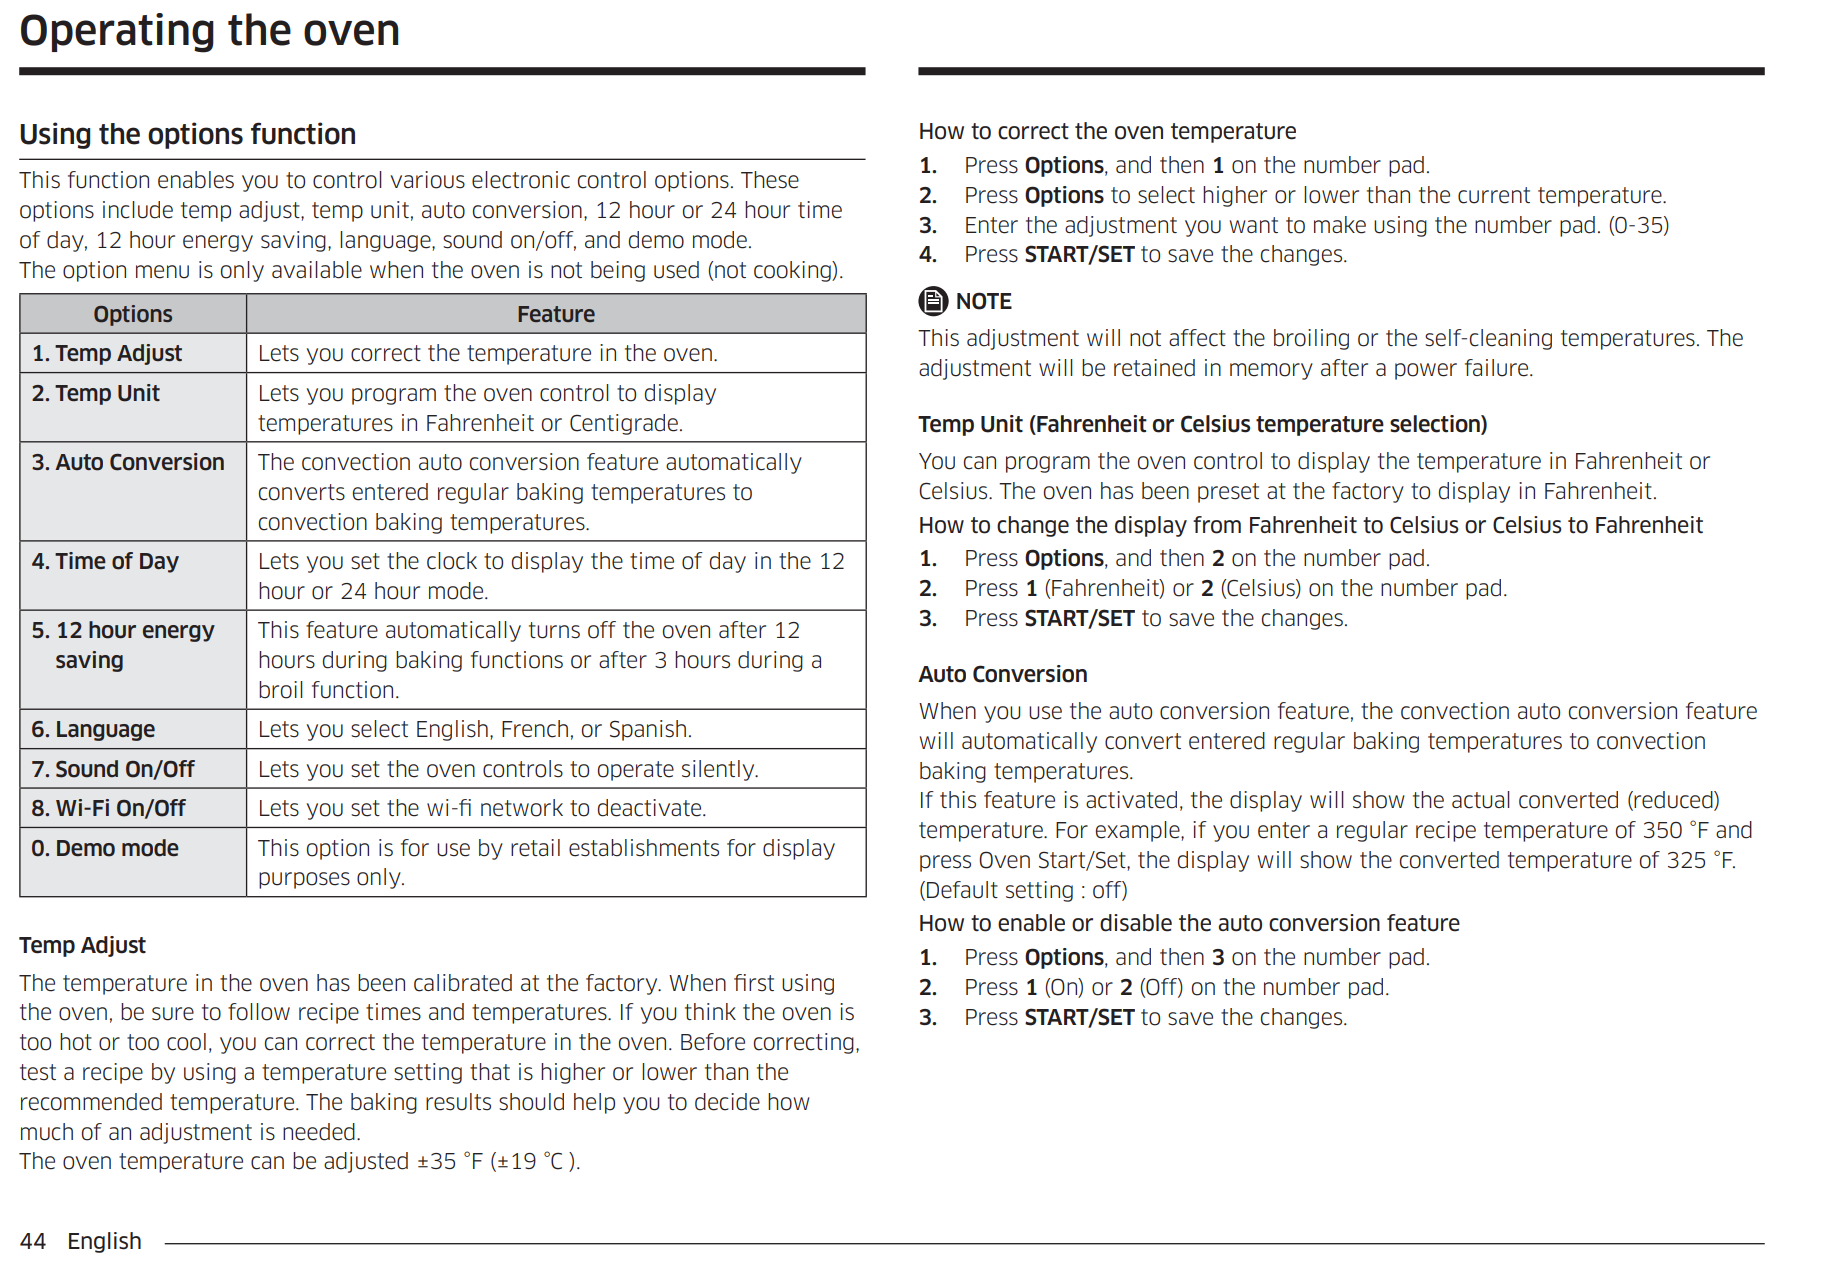
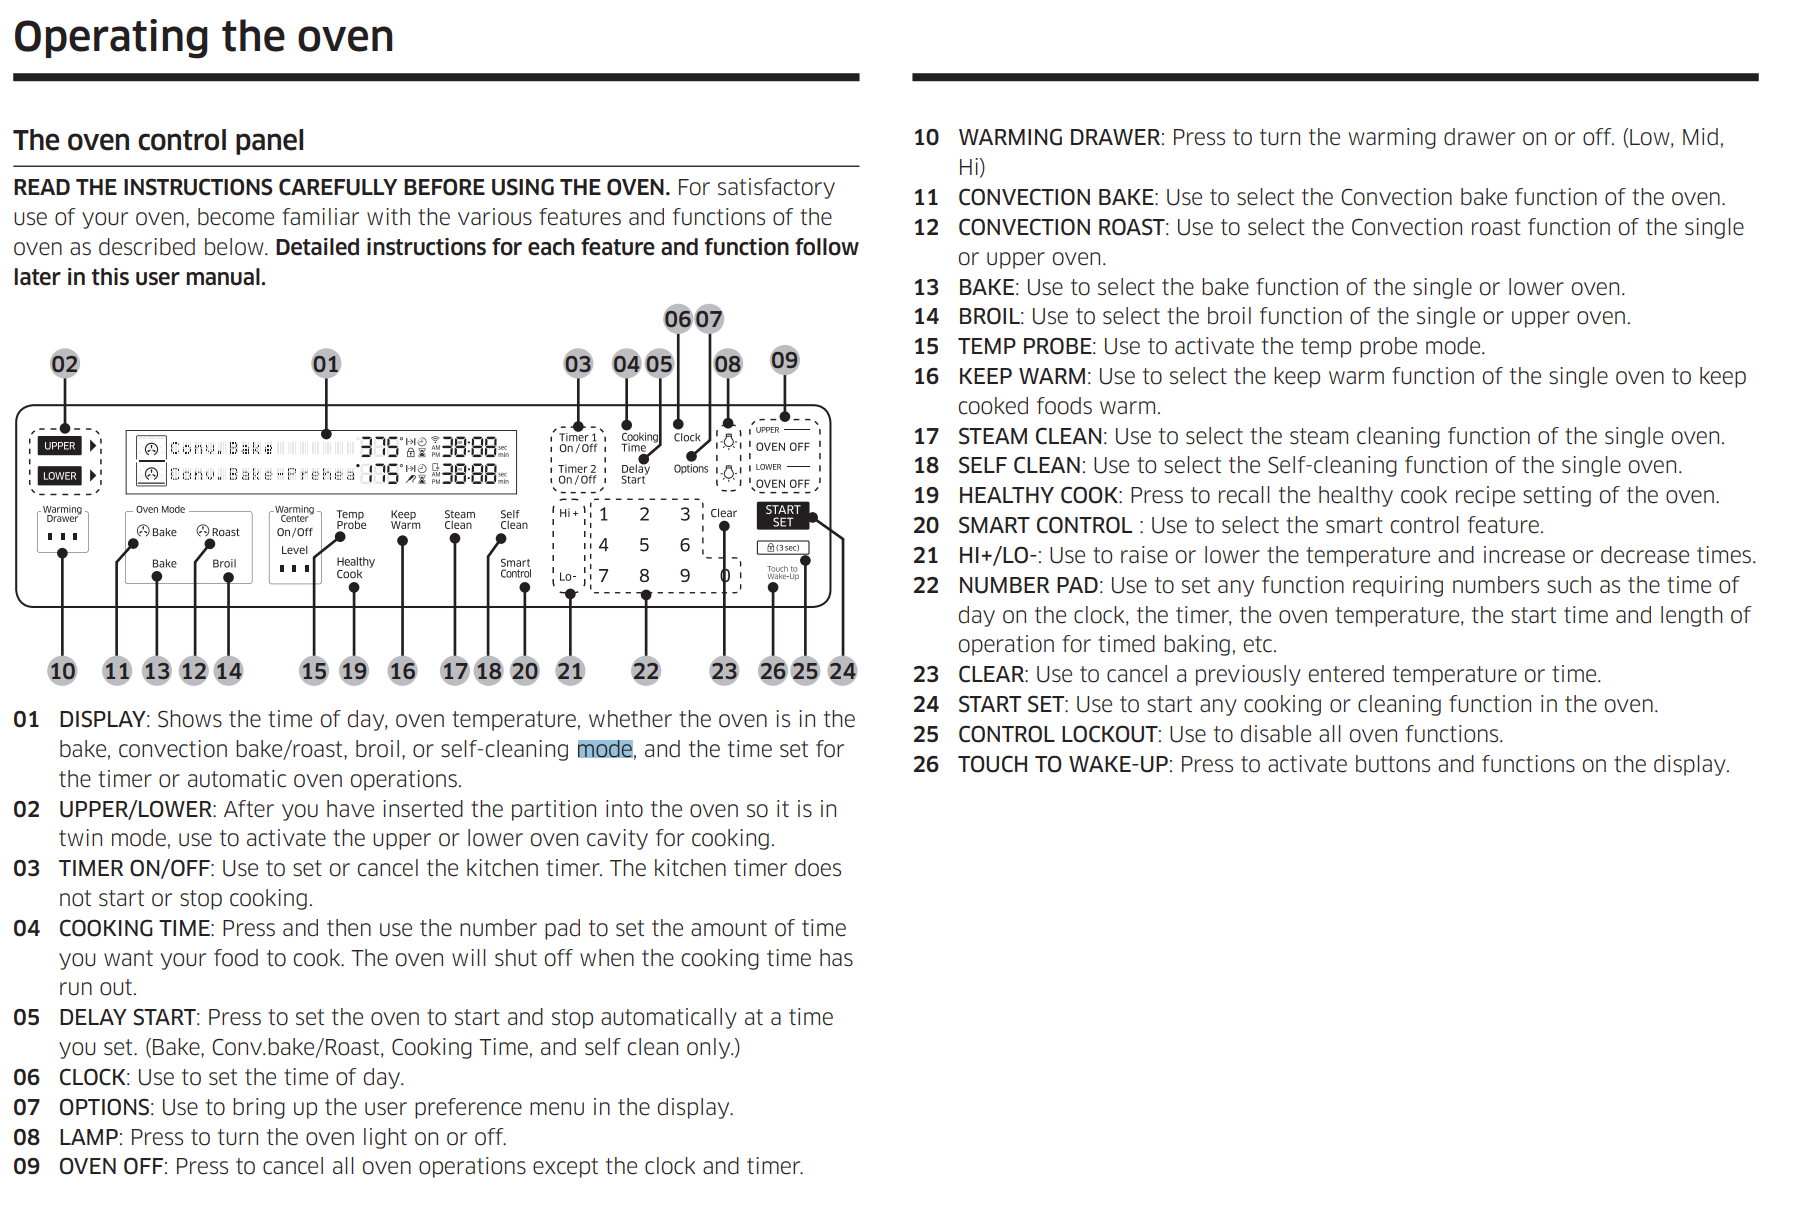
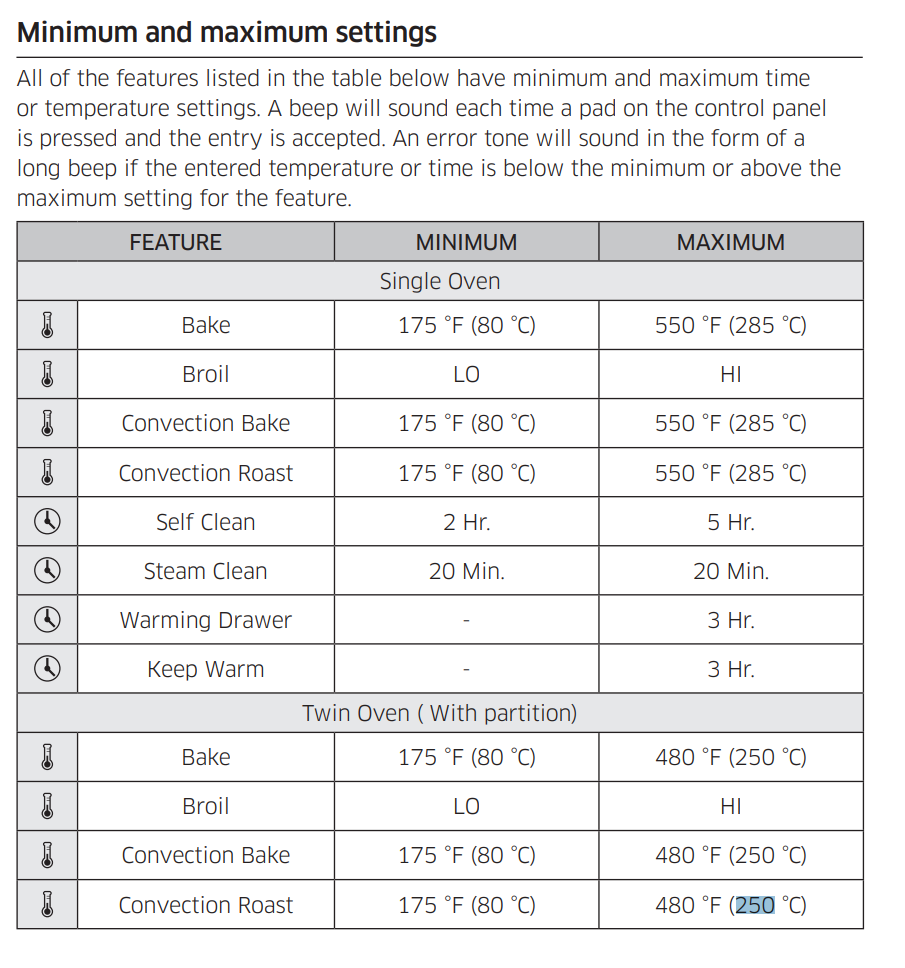
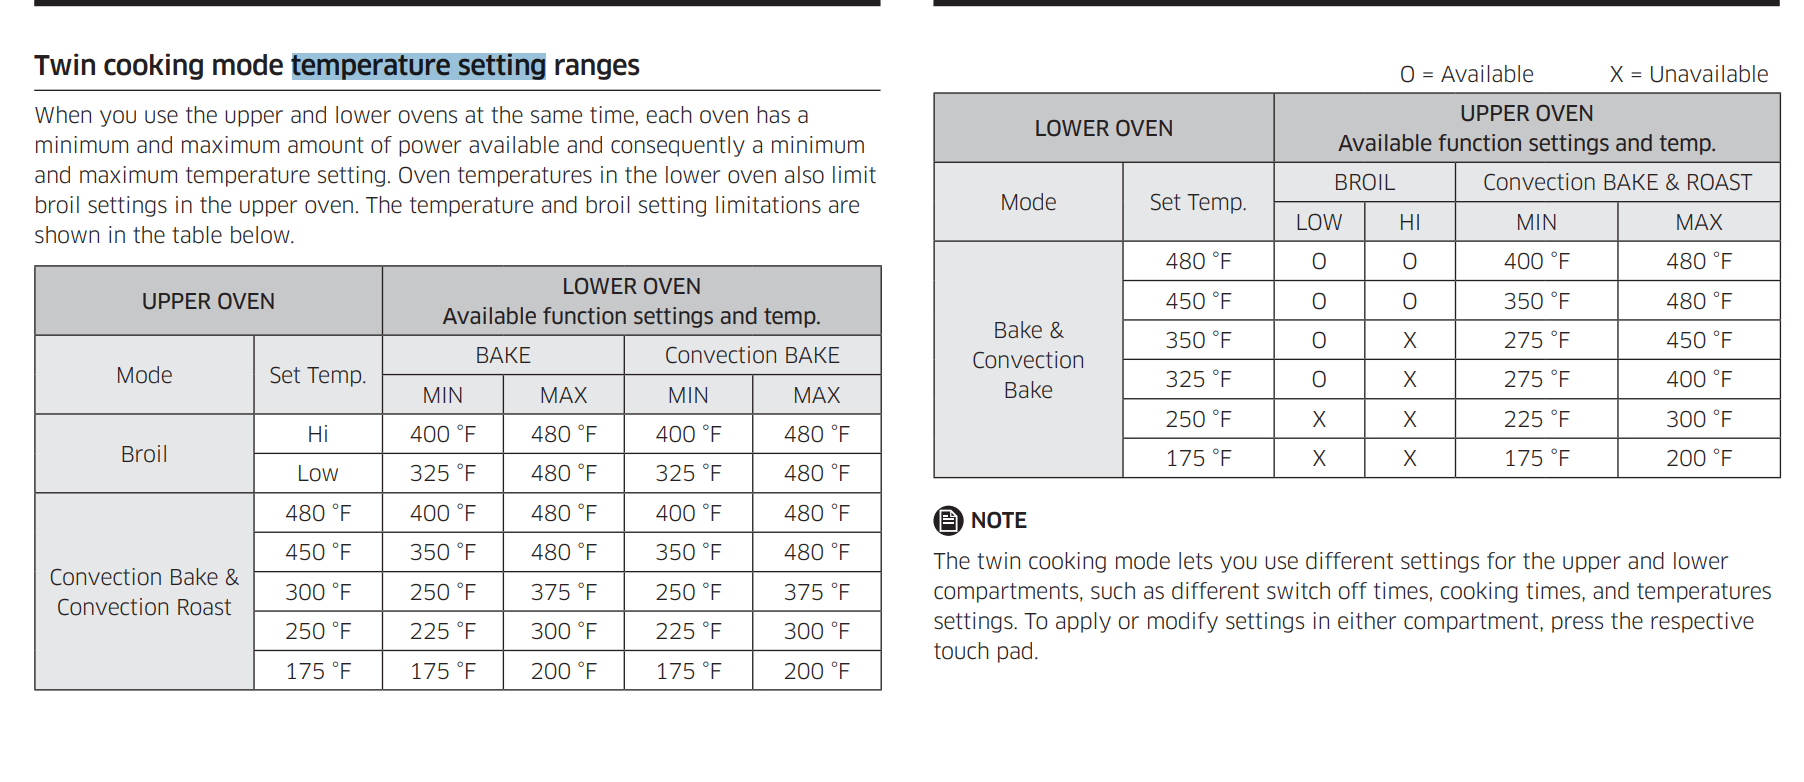
Kitchen Oven/Range – Samsung #
This section is designed to offer a quick overview of the Samsung oven/range.
Click here for the full owner’s manual documentation
Below are a few images from the owner’s manual to help as a quick-start guide.